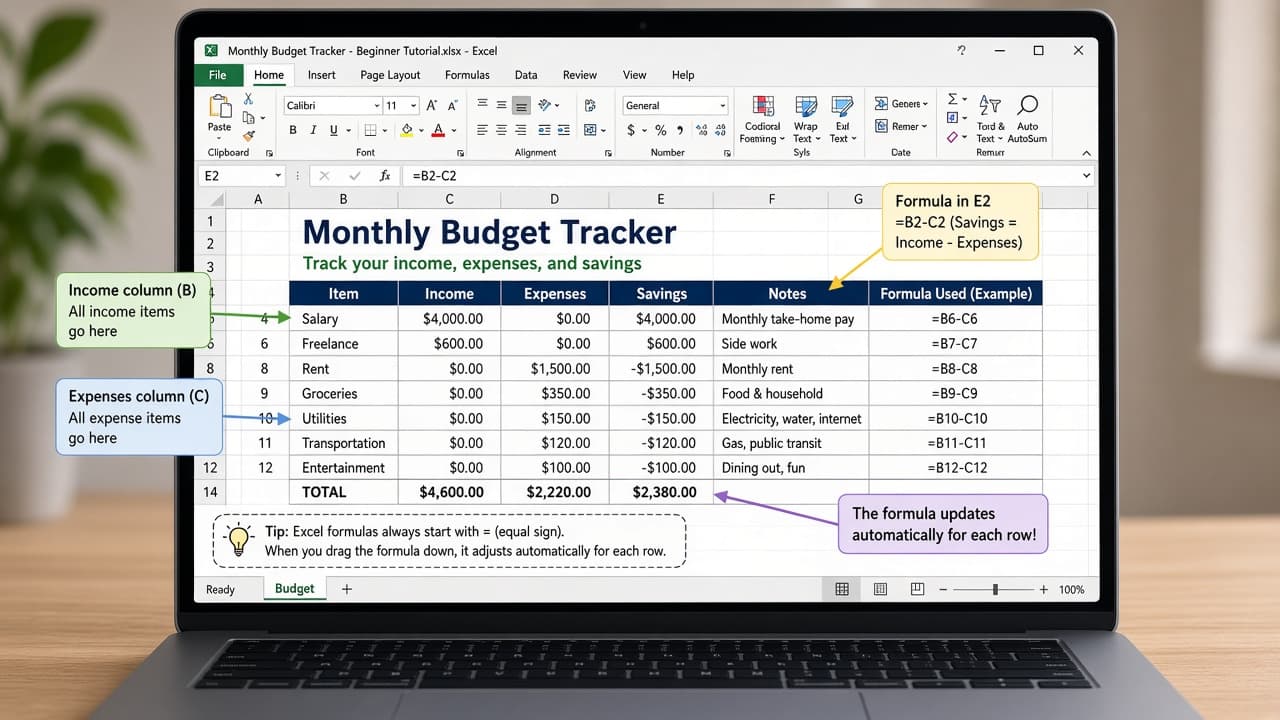
How to use Excel (beginner basics)
Learn the grid, enter data cleanly, write simple formulas like SUM and AVERAGE, then sort, filter and save a proper .xlsx file. These basics cover most everyday spreadsheet tasks.
Excel is a grid of cells where you store numbers and text, then ask the sheet to calculate and organize them. Rows run horizontally with numbers. Columns run vertically with letters. A cell address like B3 means column B, row 3. Once that map feels natural, formulas and filters stop looking mysterious.
Most beginner work is the same loop: enter clean data in columns, write a formula that points at a range, check that the result updates when inputs change, then sort or filter to find what you need. You do not need pivot tables on day one. You need accurate cells and a few reliable functions.
This guide uses Microsoft Excel ideas that also work in close cousins such as Google Sheets and LibreOffice Calc, with small menu differences. Save your file as .xlsx when you share with Excel users. Keep one header row and avoid merged cells in data tables you plan to sort.
Practice on a tiny budget sheet or a short contact list. Mistakes on five rows teach faster than staring at a blank workbook. When a formula shows an error, check for typos in cell references and for text typed where a number belongs.
Step-by-step guide
Time: 60 to 90 minutes for a first confident practice sheet
What you need
- Microsoft Excel, Excel for the web, Google Sheets or LibreOffice Calc
- A small set of practice numbers (budget, grades or inventory)
- Keyboard with easy access to Enter and arrow keys
Before you start
- Do not merge cells inside a data table you plan to sort or filter.
- Watch for numbers stored as text. They will not sum correctly until converted.
Step 01
Learn the grid and enter clean data
Headers in row 1 and consistent columns make every later step easier.
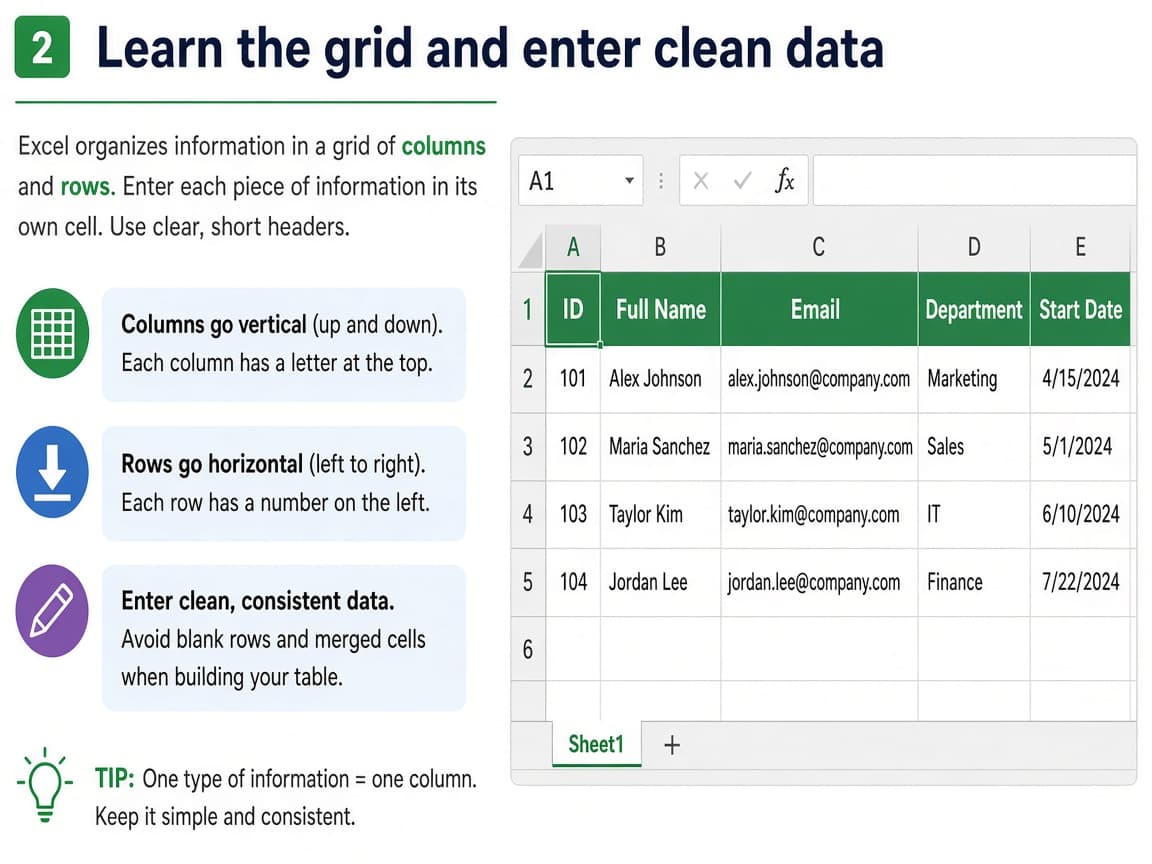
One header row and tidy columns beat a scattered scratch pad. Do this step in order
1a
Open a blank workbook and find the name box
Click cell A1. Notice the name box shows A1 and the formula bar sits above the grid. Arrow keys move the active cell. Enter confirms a value and usually moves down.
1b
Type headers across row 1
Enter short labels such as Date, Item, Amount and Notes. Keep one idea per column. Bold the header row if you like. Do not put two different data types in the same column.
1c
Fill a few practice rows under the headers
Enter sample values down each column. Keep dates in one format and amounts as numbers without currency symbols typed by hand if you plan to calculate. Add three to ten rows so later formulas have something to do.
1d
Avoid blank spacer columns inside the table
Common mistake: leaving empty columns for visual spacing inside the data block. That breaks many sorts and tables. Use column width instead of empty columns.
Step 02
Write simple formulas with cell references
Formulas always start with = and point at cells so results update when inputs change.
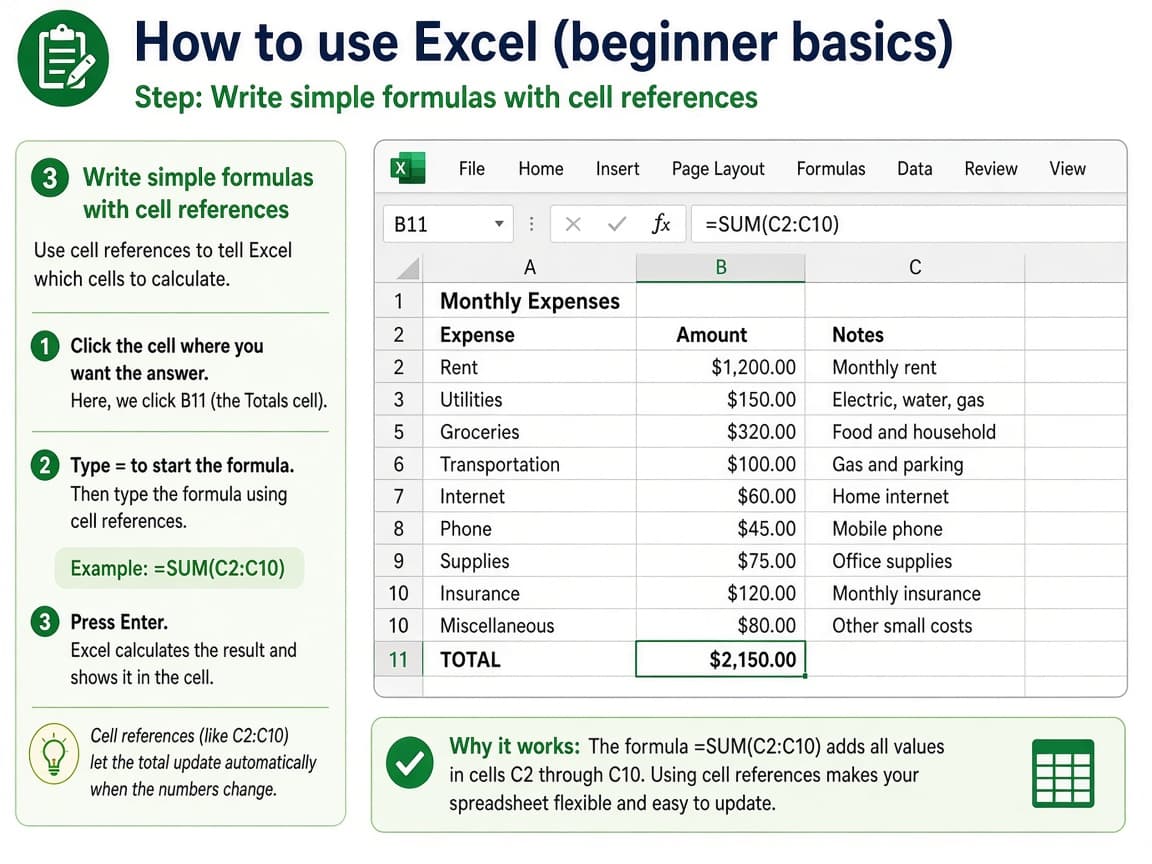
Start with = then a function or a cell math expression. Point at ranges instead of retyping numbers. Do this step in order
2a
Add two cells with a basic expression
Click an empty cell and type =B2+B3 then press Enter. Change B2 and watch the result update. This is the core idea behind every spreadsheet.
2b
Total a column with SUM
In a totals cell type =SUM( then drag across the amount cells or type a range like C2:C10 then close with ) and press Enter. SUM ignores blank cells in the range.
2c
Find a typical value with AVERAGE
Type =AVERAGE(C2:C10) for the mean of that range. Use it on numbers only. Mixed text will cause trouble or wrong results depending on the app.
2d
Do not type the answer as a fixed number
Common mistake: calculating on a phone then typing 152 into the total cell. When rows change, that number lies. Let the formula own the result.
Step 03
Sort and filter without breaking the table
Sorting rearranges rows. Filtering hides rows that do not match. Both need a clean header row.
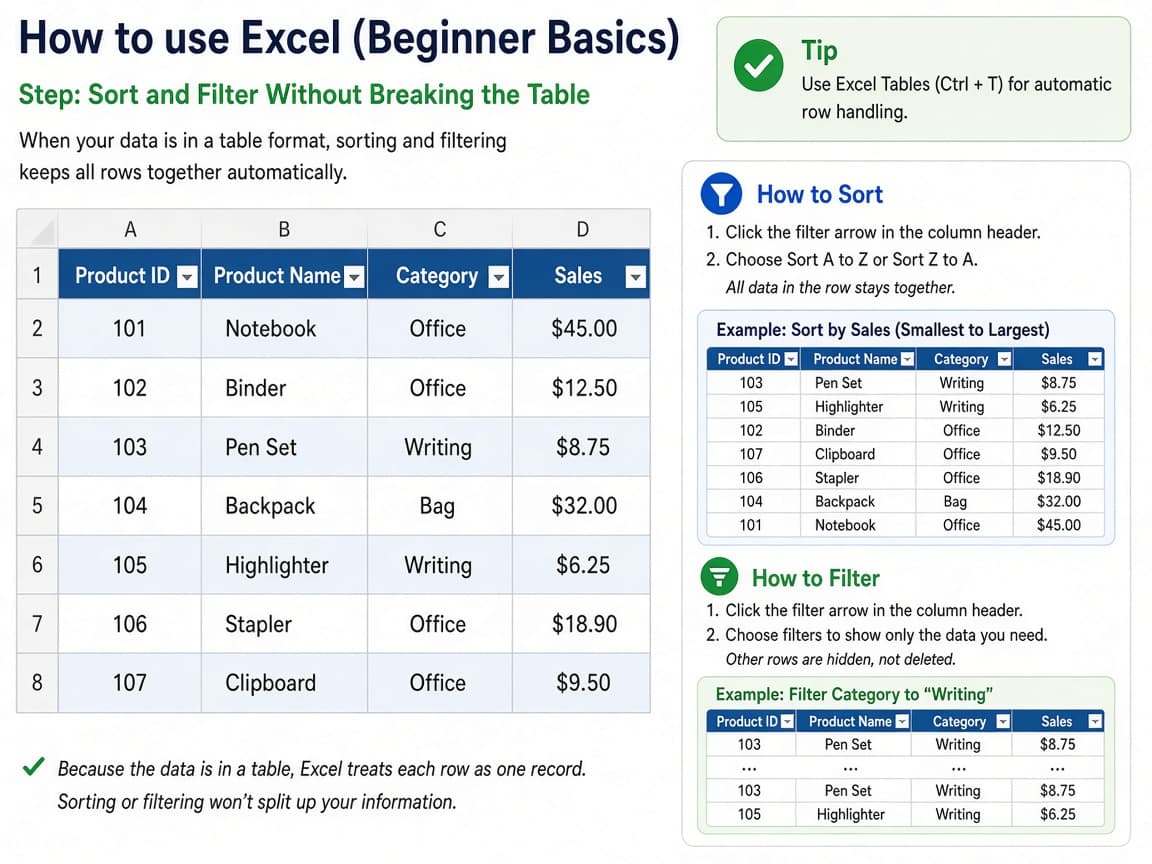
Turn on filters from the header row so you can hide and show rows without deleting data. Do this step in order
3a
Select the table including headers
Click any cell inside your data block. Include the header row in the selection when you sort. Excel can often detect the table if there are no blank spacer columns.
3b
Sort by one column
Use Sort & Filter or Data > Sort. Choose the column such as Amount or Date and ascending or descending order. Confirm that every column in the row moved together.
3c
Filter to show a subset
Turn on AutoFilter so dropdown arrows appear on headers. Pick one category or a number rule. Clear the filter when you need the full list again. Filtering hides rows. It does not delete them.
3d
Never sort a single column alone in a multi-column table
Common mistake: selecting only the Amount column and sorting it. Names and dates stay put and your data scrambles. Always sort the full row block.
Step 04
Save, name and share the workbook
A clear file name and the right format prevent version chaos.
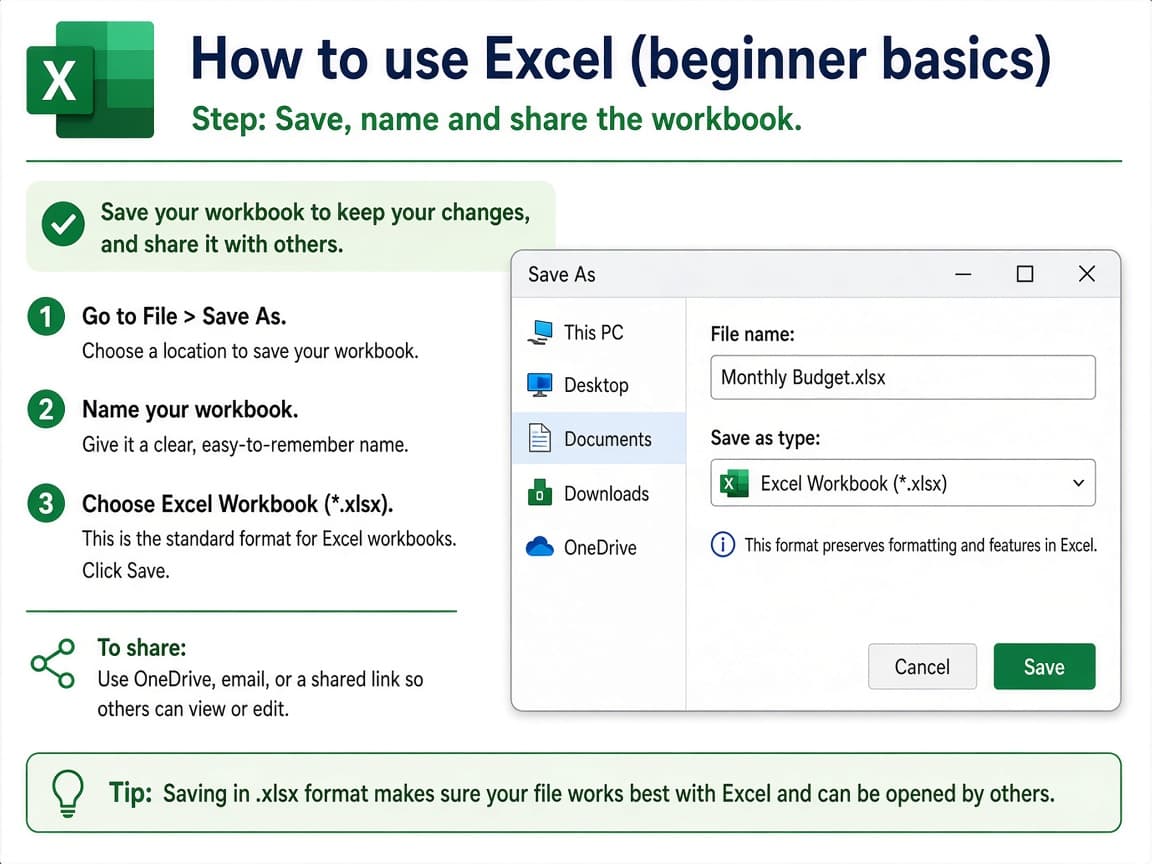
Save as .xlsx for Excel sharing unless your team standardizes on Sheets or another format. Do this step in order
4a
Save as an Excel Workbook (.xlsx)
Use File > Save As and choose .xlsx for modern Excel. Avoid relying on an unsaved Book1 forever. Save early so a crash does not wipe practice work.
4b
Name the file with project and date
Use a name like Team-Budget-2026-07.xlsx. Put the file in a folder you can find again. If you email copies, bump a version note in the name when content changes.
4c
Check that formulas still calculate after reopen
Close and reopen the file. Confirm totals still match. If someone else edits in Google Sheets, know that round-trips can change formatting even when values survive.
4d
Do not email the only copy with macros you do not understand
Common mistake: enabling unknown macros from a forwarded workbook. For beginner sheets, stick to plain values and formulas. Treat strange .xlsm files from strangers as unsafe.
Done when
- One header row with clear column names
- Values entered consistently down each column
- At least one working SUM or AVERAGE formula
- Sort or filter tested on the table
- File saved as .xlsx (or the format your team uses)
Eagle Frame's takeaway: treat Excel as a clean table first and a calculator second. Enter headers and values carefully, use SUM and AVERAGE on clear ranges, then sort and filter without breaking the table. Save a real .xlsx and you already cover most everyday spreadsheet jobs.